Saturday, October 26, 2013

What's Cooking: Something Orange, Sweet and Yummy

I have only followed Dorie Greenspan's recipe for a pumpkin"Stuffed with Everything Good" once, and it was very good.  Since then I have made multiple variations on the theme.  I find that using a covered baking dish (e.g. a dutch oven or a covered pyrex dish) simplifies the cooking method because you do not have to worry about picking a pumpkin of the right size and carving it.

I admit that my "recipe" below is rather vague.  It would be best to treat it as notes on what I did when diverging from the original recipe.

Ingredients:
  • 1 Butternut squash
  • 1-1 1/2 cups of Cheddar cheese grated (other cheeses would work well too)
  • a large crown of broccoli
  • rice (I cooked one dry cup of brown and wild rice mixture, but used about 2/3 of the result)
  • 2-3 cloves of garlic finely chopped
  • pinch of nutmeg
  • 1-2 cups of heavy cream
  • salt and ground pepper to taste


  1. Start cooking rice.  (I slightly undercooked it, because it would finish cooking in the oven.)
  2. Peel butternut squash, remove the seeds and cube it.  (OR if you are like me and think that cutting or peeling a raw butternut squash is really hard, "PRE-bake" it first -- see my notes at the end of the recipe.) 
  3. You can chop the broccoli and garlic, and grate the cheese while the butternut squash is baking and the rice is cooking.
  4. Once all of your ingredients are prepared, preheat the oven to 350F and butter your baking dish. 
  5. Mix all the butternut squash, rice, broccoli, cheese, spices/herbs and garlic in a large bowl. 
  6. Fill your baking dish with the mixture.
  7. Pour the heavy cream over the mixture.  (I used about a cup and a half.)
  8. Sprinkle a little more cheese on top (optional)
  9. Cover and bake.  The baking time will depend on how big your buttersquash was, and how much mixture you ended up with, on whether you precooked the butternut squash, on the size of your baking dish, etc.  Start checking after 40 minutes.  When the squash is almost cooked (can easily be pierced with a fork or a knife), bake the casserole for another 10-20 minutes uncovered to brown the top a little bit.
Serve with a salad as a main course, or as a hearty side dish. 

Variations on the theme:
  • Use chard or spinach instead of broccoli
  • Use sweet potato instead of the butternut squash
  • Use bread instead of rice, as the original recipe suggests
  • Check out the "Bonne Idee" section of the original recipe for more possibilities
  • Use a variety of different cheeses

PRE-baking the butternut squash:
  1. Preheat the oven to 400F
  2. Wash the butternut squash and pokes some holes in its skin with a fork
  3. Put it on a baking sheet (I cover the baking sheet with foil for easy cleanup) and bake for about 20 minutes.  (You may want to flip the squash in the oven after the first 10-15 minutes.)  You want the squash to cook enough so that the outside gets a little softer making it easier to peel. 


Friday, October 18, 2013

What's Cooking: Borsch

This is a vegetarian version of borsch, but it can easily be cooked with a little bit of beef for a more smooth meaty flavor. (See notes below).

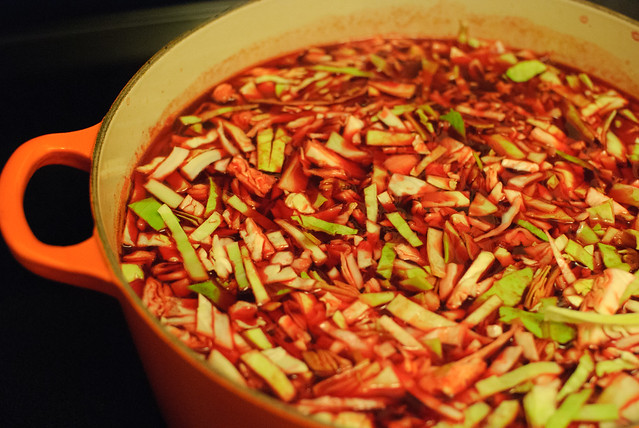
Cabbage just added to the borsch
Ingredients:
  • 5-6 medium red beets (more if the beets are tiny)
  • 1 large onion chopped
  • 1-2 cloves of garlic, minced or pushed through the garlic press
  • 1-2 carrots chopped
  • 1 fresh tomato, or 1-2 tomatoes from a can (optional)
  • fresh dill
  • 4 medium potatoes
  • cabbage (I end up using less than one head, so pick a small one)
  • black pepper
  • bay leaf
"Magic ingredients":
  • Some acidic liquid, e.g.
    • Vinegar or
    • brine from dill pickles or really anything pickled, e.g. banana peppers
  • tomato juice
  • Stems from fresh parsley, and/or dill, cilantro

  1. Peel the beets. Put them in a large pot with water and bring to boil. (You can cut them into large cubes for faster cooking.)  While the water is heating up, add 1-2 table spoons of your "acidic liquid" of choice. Add 3-5 black peppers, 1 bay leaf and the stems from the fresh herbs if using. (These are just for flavor--you can fish all of them out before serving.) When the liquid boils, lower the heat and let it simmer, until the beets are almost cooked. 
  2. This step can be done either while the beets are cooking or in advance (e.g. 1-2 days ahead). Chop onions. Peel and shred (or thinly chop) carrots. Saute onions and carrots. (It is really yummy in butter, but for health reasons sauteing in vegetable oil works just as well). When sauteing is almost done, add tomatoes and cook for a couple of more minutes. Set aside.
  3. Peel potatoes and cut them into large cubes.
  4. Chop the cabbage
  5. When the beets are cooked, fish them out of the beet broth.
  6. Add sauted onions and carrots, and potatoes to the broth and continue simmering. (Depending on whether your like your cabbage crispy or well boiled, you can add it to the beet broth now, or later when the potatoes are almost done).
  7. Shred the beets and add them back into the broth.
  8. Continue simmering until potatoes are fully cooked.
  9. Serve with sour cream and fresh dill
Notes:
  • I usually make it in a 6 quart pot, but by no means do I fill up the pot with water. (Although I do often end up with borsch that does have more stuff than liquid in it:). But you can always add more liquid later, as you go.
  • If you want to make a beef based borsch, just throw in a beef bone, or some stew kind of beef at the same time as you start cooking the beets.

Saturday, October 5, 2013

What's Cooking: Cauliflower Dal

I am starting  a new theme. I cook SO MUCH these days, but I can never remember which recipes I used, what I did, etc.  So I am attempting to capture it here for my own reference purposes and of course for your entertainment.  First up is dal with cauliflower.  This is what Nat has been eating for lunch for the last 2 days (and he has a few more days to go).

Ingredients
  • 1 1/2 chana dal (yellow lentils)
  • Veg. oil for sauteing
  • 1 onion, chopped
  • 2 cloves of garlic, minced
  • ~2 Tbsp ginger, minced
  • 2 tomatoes, skinned and chopped
  • 1 head of cauliflower, broken into florets
  • 1 tsp ground cumin
  • 1 tsp garam masala
  • dash of tumeric
  • 1/4 tsp coriander
1. Wash out the dal, and soak for 15-20 minutes
2. Cover dal with new cold water, bring to boil and simmer for 20 + minutes, until done
3. In a large pot, saute onion, garlic and ginger
4. Add cauliflower, tomatoes and spices, and cook for a couple of minutes
5. Add ~1/2 cup of water, cover and simmer
6. When the dal is almost done, add it to the cauliflower mixture, and continue cooking until the cauliflower is soft

Recipes I referenced:

Friday, October 4, 2013

My Go-To Pumpkin Dessert

It is no secret that I like to consume a dessert before I go to bed (even if it is past midnight sadly).  This requirement of course means that I bake regularly so that dessert is available.  Since I never have enough time for anything these days, I opt for desserts that are take as little time to make as possible and do not require the electric mixer (the noise might wake up the child).  This chocolate pumpkin bake thing fulfills both requirements.  (If you can think of a better name for it, please let me know!)

Ingredients:
  • 1 1/2 cup wheat flour (or any combination of wheat and all purpose flour)
  • 1 tsp baking powder
  • 1 tsp cinnamon
  • 1/2 tsp baking soda
  • 1/2 tsp salt
  • 2 eggs
  • 1 cup cooked pumpkin (1/2 of a ~15oz can)
  • 3/4 cups brown sugar
  • 1 tsp vanilla
  • 1/3 cup vegetable oil
  • 1 1/2 cups semi sweet chocolate chips

  1. Preheat the oven to 350F.  Get out an 8x8 inch square dish (Pyrex works well).  There is no need to butter the dish.
  2. In a small bowl, combine flour, baking powder, baking soda, cinnomon and salt
  3. In a large bowl, combine eggs, pumpkin, sugar, vanilla and vegetable oil and mix well.  (No need for an electric mixer or anything even remotely that vigorous.)
  4. Add the dry ingredients to the wet ones and mix just until combined. 
  5. Add the chocolate chips and mix just enough to distribute the chips.
  6. Spread the mixture in the oven proof dish and bake for 30+ minutes or until the toothpick comes clean (unless it hit a chocolate chip). 
Notes:
  • This recipe can easily be doubled--use a 13x9 inch baking dish and a whole ~15oz can of pumpkin.
  • The baked result freezes really well
  • If cooking the recipe as written, you can use half of a 15oz can of pumpkin and freeze the rest. Using the previously frozen (and now defrosted) pumpkin pure will most likely increase your baking time because it will make the batter more liquid.  The result will taste just as yummy.

Inspired by:
Pumpkin Chocolate Chip Bars from Cook Woman
Pumpkin Muffins from Smitten Kitchen