Wednesday, November 23, 2016

What's Cooking: No-Knead Crusty Bread


Ingredients:
  • 16 oz all purpose flour 
  • 16 oz wheat flour 
  • 1Tbsp table salt 
  • 18 g yeast (1 1/2 Tbsp)
  • 3 - 4 Tbsp flax seed meal 
  • 3 - 4 Tbsp flax seed 
  • Handful rolled oats 
  • Juice from 1/2 orange OR 1-2 Tbsp lemon juice, OR 3-4 Tbsp Kefir (optional)
  • water to add to juice/kefir to make 3 cups 
  • 1/4 cup olive oil 
  • 1/2 cup honey 
Method:
  1. In a large bowl, combine flour(s), salt, yeast, flax seeds, flax seed meal and oats.  (Mix just enough to get the seeds evenly distributed--it would be harder to do with the wet ingredients in.)
  2. Measure out 3 cups of water.  If you are using orange juice, lemon juice or kefir, add it to the measuring cup first.  Then add enough water to make 3 cups total.  (No need to mix yet.)  The water cannot be hot!!!  Luke warm or cold is fine.
  3. Add olive oil and honey.
  4. Mix to make very rough sticky dough.  You only need to mix enough to make sure that all the dry ingredients got wet, and that the ingredients are evenly distributed.  I usually start with a large spoon, but then use my hands for a couple of minutes just to make sure there are no dry spots left. 
  5. Cover the dough tightly.  You may let the dough sit out for up to 2 hours at room temperature and then refrigerate.  (Refrigerating right away does not seem to have an adverse effect.)  
  6. The dough is ready in about 8-12 hours.  However, it can keep in the refrigerator for at least a week.  This recipe makes enough dough to make 3 medium size round loaves.
When ready to bake:
  1. Place a piece of parchment onto a cookie baking sheet.  Don’t worry—the parchment paper will not burn in the oven.  (Do not use wax paper.)
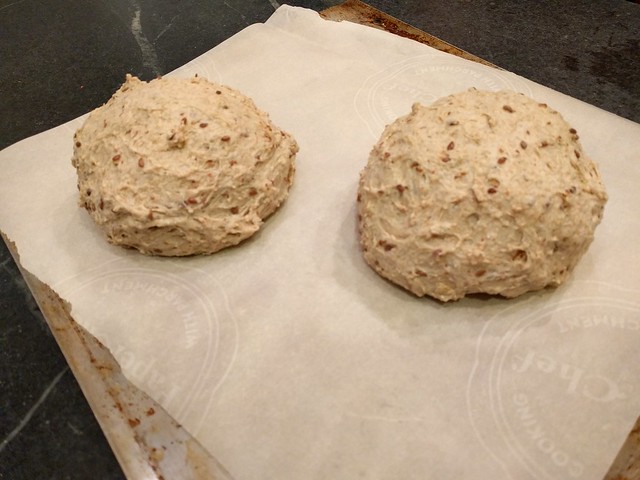
  2. Grease your hands with butter, deflate the dough in the bowl, and grab about a third of it to make one loaf—about the size of a large grapefruit. 
  3. In your hands, stretch and fold the piece of dough onto itself a couple of times, and then shape it into a ball, creating tension at the surface.  (You do not need to roll it.) Little video of me shaping the loaf
  4. Place the shaped dough onto the parchment lined baking sheet, and sift a light coating of flour over the top.  (I use a tea infuser spoon to do this step.)  The flour will keep the dough moist while it rises.
  5. Let the loaf rise at room temperature for about an hour, longer if your house is cool.  It is ok to leave the loaf out longer if needed, but ideally it should be baked in about two hours at most. 
  6. Preheat the oven to 450F, boil at least 1 cup of water, and prepare a shallow metal or cast iron pan—nothing Pyrex, ceramic or glass.
  7. When you’re ready to bake make 2-3 slashes in the loaf about ½ inch deep.  I use kitchen shears to make the cuts, but a sharp serrated knife will work as well. 
  8. Place the dough into the oven (middle rack).  Place the prepared shallow metal pan onto the bottom rack in the oven and pour the hot water into it.
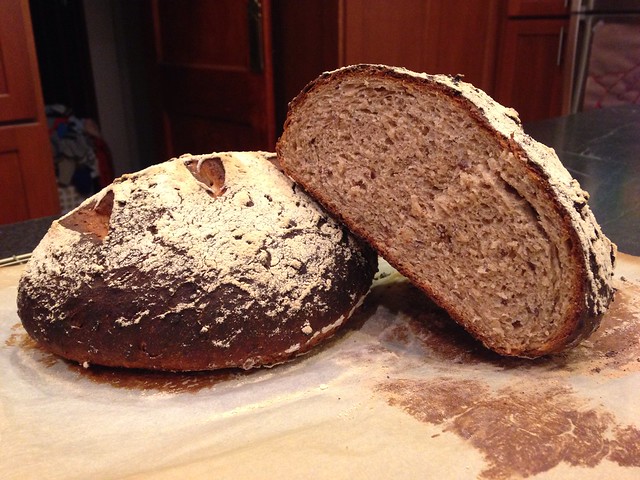
  9. Bake the bread for about 40 minutes.  I usually rotate the baking sheet 180 degrees after the first 25 minutes.  I use an instant meat thermometer to measure the internal temperature of the bread.  It should be 195-205F degrees.  The baking time may vary based on your oven, and how big of a loaf you are making.  So you may want to start checking your bread earlier.
  10. Cool the bread on a rack.  


This recipe was based on the No-Knead Crusty White Bread recipe by King Arthur Flour

Saturday, January 30, 2016

Switching to a Smart Phone

A couple weeks ago Nat and I went to the Russian Bremen Musicians show.  It was our first outing together since I started using a smart phone.  Enamored with the idea of having a decent tiny camera on me and spurned by the site of other parents snapping photos of their children I was about to take a photo of Nat in front of a New Year's Tree.  But then I did not.

Nat was not thrilled about posing at that moment.  The room was dark and crowded.  Getting a shot without other people in it would have been close to impossible. 

I quickly abandoned the idea.  I did snap a couple of low quality photos of Nat at the restaurant we went to after the show.  Looking at these photos later, I wondered why I did it.  What important moment did I try to capture, and what am I teaching my son by acting that way? 

My conclusion was that there is almost no value to these photos.  There is nothing beautiful or particularly interesting or memorable about them.  The photos did not capture the essence of the evening Nat and I spent together.  The moments I remember about the evening are not at all the  same as the ones I did or would have been able to capture on camera. 


Another thought occurred to me.  In this day and age everyone is snapping photos of everything, and then sharing them across the social network.  But by doing so, are we missing something else? What are we not capturing that cannot be photographed?  Moments that can only be described?  What moments are we missing or ruining by having a camera in our hands?

Saturday, June 28, 2014

Confessions of the Twilight Saga Junkie

I never intended to read the Twilight Books.  Last December, I was browsing through the bookshelves at Nick's parents house, when I came across the first book.  Vaguely aware that this series of books were hugely popular when they came out a few years ago, I decided read a few pages to see what the hype was all about.  A few pages was all it took to get me hooked...  

SPOILER ALERT: If you have not read the books but are planning to, DO NOT read further as I make no effort to conceal the plot. 

It is embarrassing to confess that for months I have been  completely absorbed by a piece of fiction, written for teenage girls.  It took me about a month to finish the four books, but it was another 3 months until the desire to constantly read and re-read parts of the stories started to ebb. 

I have been trying to understand why these books had such a strong pull on me. 
  • It is the story of true love, unequivocal
  • It is the story of forbidden love
  • It is the quest for permanent youth and beauty
  • It is the quest for wisdom and skills that a lifetime is not enough to acquire
  • It is the quest for becoming "good" (righteious?), despite your "fate"

If the above list is not simple enough, here is the obvious:  The main male character of the book is smart, drop-dead-gorgeous, nice, in control, and incredibly gentle and protective of his beloved.  Who would not fall for that!?

Inevitably, I eventually got past the pure ecstasy of the love story.  Once my brain started functioning again, and I began to analyze what I am reading, a few questions/issues surfaced.
  • Anyone would be bored to death attending high school for a 100 years.  Why aren't these vampires attending college or grad school.  No need to hide, since there are plenty of human perpetual students.  Alternatively, Alice, Jasper, Rosalie and Emmett could find jobs or at least some useful occupations. 
  • What were these vampires doing during World War II?!  What with their speed, strength, and extra senses, they should have excelled at flying planes, driving tanks, target shooting, or heck, just annihilating Hitler and his junkies all together.  
  • If Jasper lost control over blood from a single paper cut, then he could not have possibly made it in a classroom.  Plus the book carefully avoids the simple fact that women bleed every month (until it becomes relevant for Bella).  Smell that, dear vampires.  (I do admit that a discussion on menstruation would not have contributed anything useful to the book.)
Do I sound too harsh?  Just remember that I am writing this while still fully enjoying rereading the "saga" for the Nth time.  

P.S.  I just did an internet search on "Twilight saga junkie", and many hits came up--apparently I am not very original.

Saturday, February 22, 2014

What's Cooking: Chili

I have been meaning to write up this recipe a long time ago.  Finally...

Ingredients:
  • olive or vegetable oil for sautéing
  • 2 onions, coarsely chopped (about 3 cups)
  • 3 carrots, finely chopped
  • 2-3 sticks of celery, finely chopped
  • 2 large yellow bell pepper, chopped
  • 4 tsp minced canned chipotle chilies in adobo sauce (or to taste), minced
  • 1 15-oz can black beans, well drained
  • 1 15 oz can kidney beans, well drained
  • 1 15 oz can pinto beans, well drained
  • 28 oz can of diced or chopped tomatoes, preferably fire roasted
  • 15 oz can of tomato sauce
  • 3 cloves of garlic, minced (optional)
  • 1 green pepper, chopped, (optional)
  • 2 Tbsp chili powder (or to taste)
  • 1 1/5 - 2 tsp cumin powder (or to taste)
  • fresh cilantro, chopped, for serving (optional)

Method

1. Heat oil in a heavy large (humongous) pot, add onions, carrots and celery, and cook for a few minutes, until the vegetables are just starting to get soft.
2.  Add chopped peppers, and cook for another 7-10 minutes, until the peppers start getting soft.
3.  Add. garlic, spices, and chipotle chilies, and cook for about a minute, stirring well.
4.  Add beans, tomatoes and tomato sauces, bring to boil, reduce heat and simmer for at least 30 minutes. 

Serve with cornbread, Monterey Jack or cheddar cheese, or sour cream.   

Notes:

  • Any combination of beans would work--the original recipe calls for all black beans.  The above combination works well for us.  Cook the beans yourself, avoiding cans, if you would like to reduce sodium.
  • On chipotle chilis
    • If possible, use a food processor to "mince" (or turn into paste) the chipotle chilis (with the sauce).  I usually process the whole can, and store the remains in a glass jar in the fridge.  It lasts for a very long time.  Also good with eggs, fajitas, etc.
    • I used 4 teaspoons before we started feeding the chili to Nat.  I have been using 2 teaspoons ever since we started sharing our food with Nat, and mashing a little cornbread into Nat's plate of chili.  These maneuvers seem like a nice compromise in spiciness between him and us, the adults.
  • Simmer the chili covered if you would like to retain more liquid.  Leave the lid off if you would like the chili to thicken
  • I like my chili fairly thick, so I have never added more than ~1/4 cup of water.  You can add water or vegetable broth to add more liquid to the chili.
  • Options to increase the amount of chili cooked
    • I would not necessarily double the recipe... but if you try, please let me know how it works out
    • Add another 2-4 cups of beans (I would recommend black)
    • Add another 28 oz of fire roasted chopped tomatoes
    • Add another pepper--yellow, green, or poblano (esp. if you like things spicy)
    • Add another onion
    • Do not forget to up the spices just a tiny bit if you are increasing the beans or tomatoes.  Plus you can never have too much cumin (IMPO).
  • The chili freezes well
Recipes I referenced:

Saturday, October 26, 2013

What's Cooking: Something Orange, Sweet and Yummy

I have only followed Dorie Greenspan's recipe for a pumpkin"Stuffed with Everything Good" once, and it was very good.  Since then I have made multiple variations on the theme.  I find that using a covered baking dish (e.g. a dutch oven or a covered pyrex dish) simplifies the cooking method because you do not have to worry about picking a pumpkin of the right size and carving it.

I admit that my "recipe" below is rather vague.  It would be best to treat it as notes on what I did when diverging from the original recipe.

Ingredients:
  • 1 Butternut squash
  • 1-1 1/2 cups of Cheddar cheese grated (other cheeses would work well too)
  • a large crown of broccoli
  • rice (I cooked one dry cup of brown and wild rice mixture, but used about 2/3 of the result)
  • 2-3 cloves of garlic finely chopped
  • pinch of nutmeg
  • 1-2 cups of heavy cream
  • salt and ground pepper to taste


  1. Start cooking rice.  (I slightly undercooked it, because it would finish cooking in the oven.)
  2. Peel butternut squash, remove the seeds and cube it.  (OR if you are like me and think that cutting or peeling a raw butternut squash is really hard, "PRE-bake" it first -- see my notes at the end of the recipe.) 
  3. You can chop the broccoli and garlic, and grate the cheese while the butternut squash is baking and the rice is cooking.
  4. Once all of your ingredients are prepared, preheat the oven to 350F and butter your baking dish. 
  5. Mix all the butternut squash, rice, broccoli, cheese, spices/herbs and garlic in a large bowl. 
  6. Fill your baking dish with the mixture.
  7. Pour the heavy cream over the mixture.  (I used about a cup and a half.)
  8. Sprinkle a little more cheese on top (optional)
  9. Cover and bake.  The baking time will depend on how big your buttersquash was, and how much mixture you ended up with, on whether you precooked the butternut squash, on the size of your baking dish, etc.  Start checking after 40 minutes.  When the squash is almost cooked (can easily be pierced with a fork or a knife), bake the casserole for another 10-20 minutes uncovered to brown the top a little bit.
Serve with a salad as a main course, or as a hearty side dish. 

Variations on the theme:
  • Use chard or spinach instead of broccoli
  • Use sweet potato instead of the butternut squash
  • Use bread instead of rice, as the original recipe suggests
  • Check out the "Bonne Idee" section of the original recipe for more possibilities
  • Use a variety of different cheeses

PRE-baking the butternut squash:
  1. Preheat the oven to 400F
  2. Wash the butternut squash and pokes some holes in its skin with a fork
  3. Put it on a baking sheet (I cover the baking sheet with foil for easy cleanup) and bake for about 20 minutes.  (You may want to flip the squash in the oven after the first 10-15 minutes.)  You want the squash to cook enough so that the outside gets a little softer making it easier to peel. 


Friday, October 18, 2013

What's Cooking: Borsch

This is a vegetarian version of borsch, but it can easily be cooked with a little bit of beef for a more smooth meaty flavor. (See notes below).

Cabbage just added to the borsch
Ingredients:
  • 5-6 medium red beets (more if the beets are tiny)
  • 1 large onion chopped
  • 1-2 cloves of garlic, minced or pushed through the garlic press
  • 1-2 carrots chopped
  • 1 fresh tomato, or 1-2 tomatoes from a can (optional)
  • fresh dill
  • 4 medium potatoes
  • cabbage (I end up using less than one head, so pick a small one)
  • black pepper
  • bay leaf
"Magic ingredients":
  • Some acidic liquid, e.g.
    • Vinegar or
    • brine from dill pickles or really anything pickled, e.g. banana peppers
  • tomato juice
  • Stems from fresh parsley, and/or dill, cilantro

  1. Peel the beets. Put them in a large pot with water and bring to boil. (You can cut them into large cubes for faster cooking.)  While the water is heating up, add 1-2 table spoons of your "acidic liquid" of choice. Add 3-5 black peppers, 1 bay leaf and the stems from the fresh herbs if using. (These are just for flavor--you can fish all of them out before serving.) When the liquid boils, lower the heat and let it simmer, until the beets are almost cooked. 
  2. This step can be done either while the beets are cooking or in advance (e.g. 1-2 days ahead). Chop onions. Peel and shred (or thinly chop) carrots. Saute onions and carrots. (It is really yummy in butter, but for health reasons sauteing in vegetable oil works just as well). When sauteing is almost done, add tomatoes and cook for a couple of more minutes. Set aside.
  3. Peel potatoes and cut them into large cubes.
  4. Chop the cabbage
  5. When the beets are cooked, fish them out of the beet broth.
  6. Add sauted onions and carrots, and potatoes to the broth and continue simmering. (Depending on whether your like your cabbage crispy or well boiled, you can add it to the beet broth now, or later when the potatoes are almost done).
  7. Shred the beets and add them back into the broth.
  8. Continue simmering until potatoes are fully cooked.
  9. Serve with sour cream and fresh dill
Notes:
  • I usually make it in a 6 quart pot, but by no means do I fill up the pot with water. (Although I do often end up with borsch that does have more stuff than liquid in it:). But you can always add more liquid later, as you go.
  • If you want to make a beef based borsch, just throw in a beef bone, or some stew kind of beef at the same time as you start cooking the beets.

Saturday, October 5, 2013

What's Cooking: Cauliflower Dal

I am starting  a new theme. I cook SO MUCH these days, but I can never remember which recipes I used, what I did, etc.  So I am attempting to capture it here for my own reference purposes and of course for your entertainment.  First up is dal with cauliflower.  This is what Nat has been eating for lunch for the last 2 days (and he has a few more days to go).

Ingredients
  • 1 1/2 chana dal (yellow lentils)
  • Veg. oil for sauteing
  • 1 onion, chopped
  • 2 cloves of garlic, minced
  • ~2 Tbsp ginger, minced
  • 2 tomatoes, skinned and chopped
  • 1 head of cauliflower, broken into florets
  • 1 tsp ground cumin
  • 1 tsp garam masala
  • dash of tumeric
  • 1/4 tsp coriander
1. Wash out the dal, and soak for 15-20 minutes
2. Cover dal with new cold water, bring to boil and simmer for 20 + minutes, until done
3. In a large pot, saute onion, garlic and ginger
4. Add cauliflower, tomatoes and spices, and cook for a couple of minutes
5. Add ~1/2 cup of water, cover and simmer
6. When the dal is almost done, add it to the cauliflower mixture, and continue cooking until the cauliflower is soft

Recipes I referenced: