Showing posts with label baking. Show all posts

Wednesday, November 23, 2016

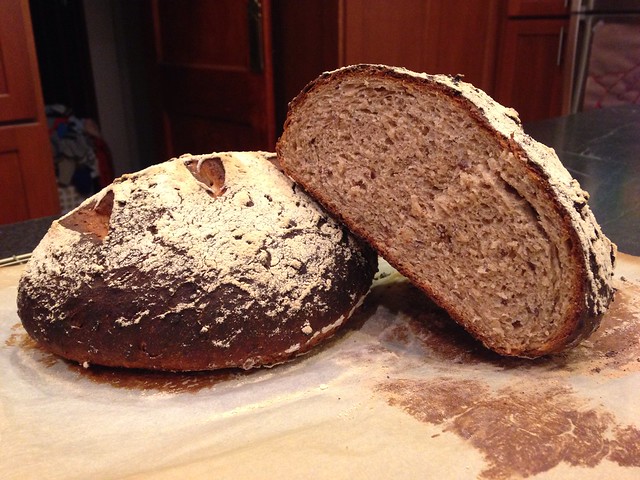
What's Cooking: No-Knead Crusty Bread


Ingredients:
  • 16 oz all purpose flour 
  • 16 oz wheat flour 
  • 1Tbsp table salt 
  • 18 g yeast (1 1/2 Tbsp)
  • 3 - 4 Tbsp flax seed meal 
  • 3 - 4 Tbsp flax seed 
  • Handful rolled oats 
  • Juice from 1/2 orange OR 1-2 Tbsp lemon juice, OR 3-4 Tbsp Kefir (optional)
  • water to add to juice/kefir to make 3 cups 
  • 1/4 cup olive oil 
  • 1/2 cup honey 
Method:
  1. In a large bowl, combine flour(s), salt, yeast, flax seeds, flax seed meal and oats.  (Mix just enough to get the seeds evenly distributed--it would be harder to do with the wet ingredients in.)
  2. Measure out 3 cups of water.  If you are using orange juice, lemon juice or kefir, add it to the measuring cup first.  Then add enough water to make 3 cups total.  (No need to mix yet.)  The water cannot be hot!!!  Luke warm or cold is fine.
  3. Add olive oil and honey.
  4. Mix to make very rough sticky dough.  You only need to mix enough to make sure that all the dry ingredients got wet, and that the ingredients are evenly distributed.  I usually start with a large spoon, but then use my hands for a couple of minutes just to make sure there are no dry spots left. 
  5. Cover the dough tightly.  You may let the dough sit out for up to 2 hours at room temperature and then refrigerate.  (Refrigerating right away does not seem to have an adverse effect.)  
  6. The dough is ready in about 8-12 hours.  However, it can keep in the refrigerator for at least a week.  This recipe makes enough dough to make 3 medium size round loaves.
When ready to bake:
  1. Place a piece of parchment onto a cookie baking sheet.  Don’t worry—the parchment paper will not burn in the oven.  (Do not use wax paper.)
  2. Grease your hands with butter, deflate the dough in the bowl, and grab about a third of it to make one loaf—about the size of a large grapefruit. 
  3. In your hands, stretch and fold the piece of dough onto itself a couple of times, and then shape it into a ball, creating tension at the surface.  (You do not need to roll it.) Little video of me shaping the loaf
  4. Place the shaped dough onto the parchment lined baking sheet, and sift a light coating of flour over the top.  (I use a tea infuser spoon to do this step.)  The flour will keep the dough moist while it rises.
  5. Let the loaf rise at room temperature for about an hour, longer if your house is cool.  It is ok to leave the loaf out longer if needed, but ideally it should be baked in about two hours at most. 
  6. Preheat the oven to 450F, boil at least 1 cup of water, and prepare a shallow metal or cast iron pan—nothing Pyrex, ceramic or glass.
  7. When you’re ready to bake make 2-3 slashes in the loaf about ½ inch deep.  I use kitchen shears to make the cuts, but a sharp serrated knife will work as well. 
  8. Place the dough into the oven (middle rack).  Place the prepared shallow metal pan onto the bottom rack in the oven and pour the hot water into it.
  9. Bake the bread for about 40 minutes.  I usually rotate the baking sheet 180 degrees after the first 25 minutes.  I use an instant meat thermometer to measure the internal temperature of the bread.  It should be 195-205F degrees.  The baking time may vary based on your oven, and how big of a loaf you are making.  So you may want to start checking your bread earlier.
  10. Cool the bread on a rack.  


This recipe was based on the No-Knead Crusty White Bread recipe by King Arthur Flour

Friday, October 4, 2013

My Go-To Pumpkin Dessert

It is no secret that I like to consume a dessert before I go to bed (even if it is past midnight sadly).  This requirement of course means that I bake regularly so that dessert is available.  Since I never have enough time for anything these days, I opt for desserts that are take as little time to make as possible and do not require the electric mixer (the noise might wake up the child).  This chocolate pumpkin bake thing fulfills both requirements.  (If you can think of a better name for it, please let me know!)

Ingredients:
  • 1 1/2 cup wheat flour (or any combination of wheat and all purpose flour)
  • 1 tsp baking powder
  • 1 tsp cinnamon
  • 1/2 tsp baking soda
  • 1/2 tsp salt
  • 2 eggs
  • 1 cup cooked pumpkin (1/2 of a ~15oz can)
  • 3/4 cups brown sugar
  • 1 tsp vanilla
  • 1/3 cup vegetable oil
  • 1 1/2 cups semi sweet chocolate chips

  1. Preheat the oven to 350F.  Get out an 8x8 inch square dish (Pyrex works well).  There is no need to butter the dish.
  2. In a small bowl, combine flour, baking powder, baking soda, cinnomon and salt
  3. In a large bowl, combine eggs, pumpkin, sugar, vanilla and vegetable oil and mix well.  (No need for an electric mixer or anything even remotely that vigorous.)
  4. Add the dry ingredients to the wet ones and mix just until combined. 
  5. Add the chocolate chips and mix just enough to distribute the chips.
  6. Spread the mixture in the oven proof dish and bake for 30+ minutes or until the toothpick comes clean (unless it hit a chocolate chip). 
Notes:
  • This recipe can easily be doubled--use a 13x9 inch baking dish and a whole ~15oz can of pumpkin.
  • The baked result freezes really well
  • If cooking the recipe as written, you can use half of a 15oz can of pumpkin and freeze the rest. Using the previously frozen (and now defrosted) pumpkin pure will most likely increase your baking time because it will make the batter more liquid.  The result will taste just as yummy.

Inspired by:
Pumpkin Chocolate Chip Bars from Cook Woman
Pumpkin Muffins from Smitten Kitchen

Friday, May 25, 2012

A Week of Baking

Last week could be classified as the baking week.  It started with making mushroom pie for dinner early in the week and culminated in cakes for Saturday and Sunday dinners.  (I did chicken out of also making Tarte Tatin for Saturday as well, mostly because being a mother of a then 7 week old child I could not spend all day baking.)

The cakes required a lot of planning and baking ahead, since I never have more than 2 hours at a time for any activity, and I was not going to give up my precious fewer than 6 hours of night time sleep.

The Saturday cake was inspired by the Miroir aux Fruits, or Fruit Mousse Miroir cake, from the Fundamental Techniques of Classic Pastry Arts book.  I say "inspired" because I changed just about every single component called for by the recipe--sheet genoise instead of Biscuit Joconde, no egg whites in the fruit mousse, raspberry  instead of apricot jam for the mirror.  One of the wonderful things about this cake is that you are supposed to freeze it as part of the preparation.  So it is perfect for the very occasion when you do not want to be cooking on the day of the "event".

I tried to reproduce the "look", and I might have achieved it if I managed to make enough mousse. That would be something to look forward to next time.
Taste wise, my raspberry mirror mousse cake was definitely a success, which you could not say about the Sunday cake.
Sunday cake was planned to be a true cake in the American style--multiple layers, lots of frosting, etc.  However, I went a bit overboard.  I have used all the components of this cake in other combinations with success--super moist chocolate cake, ganache, swiss meringue buttercream, raspberry puree.  However, all of these wonderful things together made such a rich cake, that it almost felt like we were eating a little bit of cake with a lot of sweet butter.  Nick and I "struggled" for 2 days, but tossed almost half the cake in the end.

To redeem myself I made just the chocolate cake yesterday, which Nick and I have been enjoying without any filling or frosting.

Saturday, April 28, 2012

The Joy of a Quick Dessert

I have become a big fan of the yogurt cake for two very simple reasons.  It tastes good, and it is super easy to make--no exotic ingredients or special tools required.  You do not even need an electric mixer!

Another positive aspect of this cake is that you can make it in a variety of ways, changing its flavor to whatever pleases you most.  The plain version is great by itself, or with a thin layer of raspberry jam.  I also love the blueberry lemon and the cranberry orange variations.  There are many other variations to try too.

The recipe I rely on is the Yogurt Cake by Clotilde of Chocolate & Zucchini.  I do tend to skip rum--just not the flavor I like in this particular cake.  If you are out of yogurt, the recipe also works with sour cream.  You can make it as a cake in a 9 inch cake pan, or in a 8 x 8 inch baking dish.  You can also bake the recipe as muffins, though the baking time will have be adjusted.

Ingredients:
  • 2 eggs 
  • 1 cup plain unsweetened yogurt 
  • 1 cup sugar 
  • 1/3 cup vegetable oil 
  • 2 cups all-purpose flour 
  • 1 1/2 teaspoon baking powder 
  • 1/2 teaspoon baking soda 
  • a good pinch of salt 
  • 1 teaspoon pure vanilla paste/extract
Recipe:
  1. Preheat the oven to 350° F
  2. Line the bottom of a round 9 inch cake pan with parchment paper and grease the sides.  (When I bake this in the 8 x 8 square dish, I skip the parchment paper, and just butter the dish.)
  3. In a large mixing bowl, combine the yogurt, eggs, sugar, vanilla, and oil. 
  4. In another (smaller) bowl, mix the flour, baking powder, baking soda, and salt. 
  5. Add the flour mixture into the yogurt mixture and mix together just until everything is wet.  It is very important not to over-mix, or large pockets of air will form in your cake.  
  6. Pour the batter into the prepared pan, and bake for 30 to 35 minutes, until the top is golden brown and a cake tester comes out clean.  (In my oven, the baking time is usually longer (40-45 minutes), but I usually start checking after 30.)
For the cranberry orange variation, before the above step 5 do the following:
  • add a cup of cranberries (I usually use frozen ones) to the flour mixture and mix (DO NOT use craisins here)
  • add zest of 1 orange (or to taste) to the yogurt mixture and mix
For the blueberry lemon variation, before the above step 5 do the following:
  • add a cup of blueberries (I usually use frozen ones) to the flour mixture and mix
  • add zest of 1 lemon (or to taste) to the yogurt mixture and mix
Enjoy!

Tuesday, February 14, 2012

Cinnamon Rolls for Valentines Day

Happy Valentines Day!
Before being inverted
We are celebrating with some shapeless but yummy cinnamon rolls.
After being inverted
After being inverted and separated
While these buns are out of the oven, another bun has about 7 more weeks to go.

Wednesday, October 12, 2011

Rosh Hashanah

It is a little bit late to talk about Rosh Hashanah, but I will do it anyway. 


This was our second year in a row baking our own challah—truly a team effort where I mix the dough and shape the bread, while Nick monitors the third and final rising, bastes the bread with the egg glaze and poppy seeds, and does the actual baking. 

Sunday, January 9, 2011

Grandma Jo's Chocolate Quick Cake

Grandma Jo, Nick's great grandmother
whose full name was Anna Josephine
Even though this cake seems to have been popular in Nick’s family while he was growing up, I only made it once before, a few years back—too long ago to remember exactly what I did.

Inconveniently, the recipe omits two small but important details: the size of a baking dish to use, and how intensely to beat the eggs.

I compared the amounts of the ingredients to other recipes of known volumes and gave the recipe a couple test runs. Now I can attest that the batter fits nicely into two 9” round pans for a two layer cake.

In an effort to spread the pleasure of cake over a longer period of time (by freezing some of it), I have also baked the batter in two 6” round pans. The baking takes longer, and the cakes are higher. You can freeze one, and slice the other one for a small two layer cake.
  • 1 1/2 cups flour (186 g)
  • 1 cup sugar
  • 1/2 cup cocoa powder (39 g)
  • 1 tsp baking soda
  • 1 tsp salt
  • 1 egg
  • 1 cup buttermilk
  • 1/3 cup vegetable oil
  • 1 tsp vanilla
  1. Sift together flour, sugar, cocoa powder, baking soda and salt. 
  2. Preheat the oven to 350F, and butter the baking dish. (I also lined the bottom of the pans with parchment paper.)
  3. In a medium bowl, beat the egg. (I did use a hand held mixer).
  4. Add buttermilk (I beat the mixture a little more).
  5. Mix in oil and vanilla
  6. Gently mix in the dry mixture above. (I did not use a mixer at this point. If you do opt for the mixer at this point, stay at the lowest speed possible.)
  7. Bake at 350F for 20 to 25 minutes for 9” pans, or at 325F for 40 to 45 minutes for 6” pans.
My Chocolate Quick Cake recipe card comes complete with a recipe for the cake frosting on the back.
  • 2 Tbsp butter
  • 1 square chocolate (probably 1 ounce)
  • 1 1/2 cups powdered sugar
  • 2 Tbsp hot water
  • vanilla (optional)
  1. Melt butter with chocolate 
  2. Add the rest of the ingredients, and beat all until smooth
In the name of full disclosure, I have never made the frosting above. My note that a square is an ounce of chocolate is just a guess.

So far I have been using a simple ganache frosting instead.
  • 1/2 cup heavy cream 
  • 1/3 lb bittersweet chocolate, chopped
  1. Heat the cream in a small pot until just boiling 
  2. Take the pot off the heat, and mix in the chocolate until smooth
  3. Cool until the mixture thickens, but is still easy to spread.
The above amount is just enough for a 6” inch cake, but should be doubled for a 9” inch cake.

Nick and I also enjoyed the cake frosted with the ganache, but filled with rapberry preserves.

Tuesday, December 14, 2010

Joanne's Parker House Rolls

I tried my very first Parker House roll in Walla Walla while spending my first Christmas with Nick’s family. The rolls Nick’s grandmother, Joanne, made were simply delicious. Legend has it when Nick was eleven, he ate as many as 14 in one sitting, accompanied by a complete Christmas Eve dinner—you know, turkey, stuffing, mashed potatoes, gravy, Christmas Jello... So of course I asked Joanne for the recipe, and she kindly wrote it out on a card for me.

After making several rather tasteless batches of rolls, I asked Nick’s Aunt Lisa, well known for her humor and excellent cooking, for help.

If one can laugh loudly in an email, Lisa certainly did. The subject line of the first email back to me read: “TEASPOON????”  She suggested that I attempt the recipe using 1/4 cup instead of 1 teaspoon of sugar. I followed Lisa’s advice, and for the first time ever my rolls had a taste and were actually pleasant to eat.

Unbeknownst to me, the sugar measurement saga continued—Lisa and Joanne were vigorously exchanging emails on the subject:

Joanne:  I've never in my life put 1/4 cup of sugar in Parker House rolls! I put in 1 heaping T and that's it.

Lisa:  The recipe that I am using is the one you pointed out in the Better Homes and Gardens cookbook [which calls for 1/4 cup of sugar]. … Your T tells me that you use a tablespoon, heaping, correct? Is that a measuring tablespoon or a serving spoon from your silverware? Either a heaping measuring tablespoon or a heaping "tablespoon" from my silverware is about 1/8 cup, so it isn't really that far off.
Joanne:  All this funny stuff about the sugar in the rolls. Actually in both rolls and spaghetti sauce I use one of my big cooking spoons that hang above stove and put in a heaping one of those for the sugar!
Sometime later someone in the family measured the volume of one of those “big cooking spoons that hang above the stove” heaping with sugar, and it came out to be almost exactly 1/4 cup.

A few years have gone by since then, and I have gotten better at making rolls. Besides changing the sugar amount, I made two other minor adjustments to Joanne’s original recipe:
  • I use butter instead of Crisco.
  • I make the dough the night before and let it rise in the fridge. Putting the dough into the cold might sound like blasphemy to Joanne, but a slow rise gives bread more flavor. Plus, doing so allows me to do half the work the night before.
Joanne no longer cooks, and other people in the family take on the responsibility of preparing the Christmas Eve dinner. Everyone tries to help, and I have been making a triple batch of Parker House rolls for the last two years. Hopefully the family will not bar me from doing so again, now that I am publicly revealing my changes to Joanne’s original recipe.

Joanne’s Parker House Rolls as written on my card

  • In a large bowl:
    • 1 Tbsp suga
    • 1 tsp salt
  • In a small pan:
    • scald 1 cup milk with 2 or 3 Tbsp of Crisco
    • Stir, don’t let boil
  • Pour over sugar/salt in a bowl, stir to dissolve
  • Let cool to just warm
  • Add 1 beaten egg
  • Add 2 ¼ tsp dry yeast dissolved in very warm water (not too hot)
  • Stir in 1 cup of flour (will be lumpy)
  • Stir in 1 more cup flour, beating well and scraping off sides of bowl
  • Measure 1 more cup flour, add about ¾ cup. If dough is still sticky add rest of flour. If dough is stiff, don’t add flour.
  • Beat dough vigorously with large spoon, scrape sides and bottom of bowl beating air into the dough
  • Cover with dish cloth. Set in a warm spot. Let rise 2 hours.
  • Roll out (to about 1/2”) on floured pastry cloth, rolling pin has cloth cover as well.
  • Use 2 ½” cookie cutter, dab melted butter on each. Stretch circle, fold over and press top edge down on greased sheet. (Will keep rolls from popping open.)
  • Bake @ 400F. Check at 8 min – 10 min max. Will be lightly brown.

Joanne’s Parker House Rolls with a few adjustments

Ingredients:

  • 1 cup of milk
  • 3 Tbsp of butter + more butter melted to brush the rolls
  • 1/4 cup sugar
  • 1 tsp salt
  • 1/4 cup warm water
  • 2 1/4 tsp dry yeast
  • 1 egg slightly beaten
  • 3 cups of flour (more for rolling out the dough)
  1. Combine sugar, salt, milk and butter in a small pot, scold, but don’t let boil. (If it boils, it is ok). When the butter, sugar and salt dissolve, take off the heat and let cool. 
  2. In a cup, dissolve yeast in warm water, and let it stand for 5-10 minutes. 
  3. When the milk/butter mixture cools (I sometimes use ice baths to speed up the process), stir in the beaten egg, and the yeast/water mixture. (The milk/butter mixture should not feel hot—you don’t want to cook the egg or kill the yeast).
  4. Stir in 2 cups of flour one at a time, beating well with a large spoon and scraping off the sides.
  5. Measure 1 more cup of flour, but only add about 3/4 of the cup. Only add more flour if the dough still feels sticky. The dough should remain a little sticky. (Note: When doubling or tripling the recipe, sometimes more flour is needed.)
  6. Beat dough vigorously with a large spoon (or knead with your hands) beating air into the dough.
    1. To make a day ahead: cover the bowl tightly and place in the refrigerator. The next day, bring to room temperature before rolling the dough out.
    2. To make the day of: cover with a dish cloth, set in a warm spot, and let rise for 2 hours or until the dough has doubled in size.
  7. Roll the dough out to about 1/2 inch thickness on floured surface. (I do not use a pastry cloth or a cloth cover for the rolling pin.)
  8. Use 2 1/2 inch cookie cutter to cut out circles in the dough.
  9. Dab or brush melted butter on each circle.
  10. Stretch each circle, fold it over (in half) and press the top edge down.
  11. Cover with a dish cloth, set in a warm spot, and let rise for about an hour.
  12. Bake in 400F oven for 8-10 minutes. The rolls should be just lightly brown.

Thursday, September 9, 2010

Happy and Sweet New Year!

ChallahNick and I made this challah bread together--I mixed and shaped the dough, and Nick basted the loaf with egg, added poppy seeds and baked it. It was truely a team effort! Shana tova!

Wednesday, August 25, 2010

Cooking Laurie's Blackberry Pie

Laurie makes amazing pies, including this blackberry pie.

Crust
2 cups flour
2/3 cups of shortening (Laurie uses Crisco)
7 table spoons of cold water

Filling
4 cups of berries washed
3/4 - 1 cup of sugar, depending on sweetness of the berries
3 tablespoons of flour
couple of table spoons of lemon juice
butter

I am not a big fan of Crisco (or margarine). So while I follow Laurie's instructions for the filling faithfully, I improvise on the crust. It usually comes out fine (Nick being the judge), though it tastes very differently (understandably so) from Laurie's. Instead of Crisco, I use butter and substitute some vodka straight out of the freezer for some of the cold water. (The vodka idea came from this "foolproof" pie crust recipe from Cooks Illustrated.)

The butter is great for taste, and shortening is great for flakiness. To make up for the flakiness that my crust will lose due to my resistance to shortening, I try to leave the butter in relative large chunks while mixing the dough.

The alcohol from the vodka will evaporate during baking, and no aftertaste will remain. Yet using vodka gives me a slightly larger margin of error for adding too much liquid. (If you add too much water, the crust will be tough and soggy.)

  1. Cut the butter into 1/2 inch pieces and sprinkle them over the flour in a bowl. Work the butter into the flour until the butter pieces are about the size of beans. To accomplish this I use a pastry blender, but a fork and a knife will also work. You want to keep the butter as cold as possible. (Sometimes I even refrigerate the bowl before starting.) So resist the temptation to use your hands.
  2. The amount of liquid for the recipe is approximate. Add one table spoon at a time, gently working it into the dough. Switch to vodka after about 4 spoons of water. Stop adding the liquid as soon as the dough starts coming together. (You will certainly need to use your hands for to do this.)
  3. Form the dough into two balls, wrap in plastic wrap and refrigerate while you are making the filling.
  4. In a bowl, gently toss berries with sugar (I have yet to add more than 3/4 cups), flour and lemon juice.
  5. Grab your favorite pie plate--a 9 inch Pyrex one works great for me.
  6. Remove one ball of dough from the refrigerator, and roll it out into a circle (12 inches in diameter according to most cook books) on a lightly floured surface. (Laurie uses a pastry cloth, while I roll it out directly on the kitchen counter.)
  7. Place the dough into the pie plate. The dough edges should be hanging a bit over the plate. Refrigerate while you work on the second half of the dough.
  8. Roll out the second ball of dough.
  9. Remove pie plate with the bottom crust from the refrigerator and pile the berry mixture into it.
  10. Dot a few pieces of butter here and there on top of the berry mixture. I generally use less than a table spoon total for this step. I do not know how much Laurie uses.
  11. Place the remaining rolled out dough on top of the berries, and seal the edges. Cut slits into the top crust to allow steam to escape during baking.
  12. Preheat the oven to 375F.
  13. Edges of the pie need to be covered at first to prevent them from overcooking. I have tried doing this with strips of foil, and what a pain that was. Finally, I discovered a much easier way to do it in the Better Homes and Gardens Cook Book. The book suggests to "fold a 12-inch square of foil into quarters; cut a 7-inch hole out of the center; unfold and loosely mold the foil ring over the pie's edges." (You do not need to measure the foil--just approximate.)
  14. If you pie is ready to go, but your oven is still heating up, put the pie into the refrigerator until the oven is ready.
  15. Bake for about 25 minutes. Remove the foil and bake for another 20-30 minutes, until the top is golden and the filling is boiling. The times here are very approximate and really depend on the oven. The filling sometimes escapes from the pie and into the oven, so you may want to put the pie plate onto a small cookie sheet in the oven.
We love to eat it warm with vanilla ice cream.

Excellent information on making pie crust:

Sunday, March 15, 2009

Chouquettes (Or Empty Cream Puffs)

chouquettes
Mom decided to let me make dessert for a dinner she hosted on Saturday night. On Thursday evening I poured over recipes and decided to make a second attempt at cooking a Napoleon. (Some of you may remember my first rather unsuccessful attempt...) A few hours later I promptly abandoned that idea after completely destroying yet another batch of pastry cream.

chouquettes
So instead of a Napoleon, I spent Saturday morning baking chouquettes--essentially cream puffs without the pastry cream inside sprinkled with some coarse sugar. I followed three almost identical recipes (David Lebovitz, SmittenKitchen, and a cook book by Nick Malgieri "How To Bake"). All three are pâte à choux recipes with the only difference being the amount of sugar used in the dough and the baking temperature.

My dough was a little too liquidy, but the chouquetts puffed up sufficiently anyway. Next time I may try to deep a few of them into chocolate.

Tuesday, January 6, 2009

Thanksgiving Recap--Napoleon

Grandparents in the Boston Public GardenNapoleon is one of my favorite desserts that my grandmother used to make when she was younger. Napoleon, the dessert, refers to layers of puff pastry frosted with pastry cream. When done well, a Napoleon is light, moist and melts in your mouth, and my grandmother’s Napoleons did just that. When I learned that my grandparents were coming to Boston for Thanksgiving, I decided that it was my one-in-a-million chance to learn how to make Napoleon from the master herself.

puff pastry in the makingWhen my grandparents came over to my apartment, my grandma and I set out to prepare the puff pastry dough. Under Grandma’s close watch I mixed water, eggs and flour, and rolled the butter into the dough folding it into envelopes. In the course of the day I repeated the rolling and folding process one more time. Grandma said that she sometimes rolled and folded the dough two more times, but she thought that the extra effort was unnecessary.

puff pastry in the makingIn the evening, after my grandparents left, I made a double portion of the pastry cream from the Boston Cream Pie recipe. Unfortunately, I accidentally overheated the mixture, and the cream cooled into a jingly solid. So the next evening I made another batch of the pastry cream, now using Grandma’s recipe.

Unfortunately I had to bake the puff pastry without Grandma’s supervision, and I might have kept it in the oven for too long. It was well after midnight, when I frosted the baked puff pastry sheets with the newly made pastry cream.

remaining pieces of my Napoleon after the Thanksgiving dinnerAfter spending the night out on the counter my Napoleon acquired the proper sweetness and flavor thanks to the pastry cream. Still the pastry was far from melt-in-your-mouth. In fact it was so hard, that breaking a piece off with just a fork was impossible. I tore into my piece with my teeth, while Nick, civilized as he is, used a knife.

Friday, December 19, 2008

Thanksgiving Recap--The Corn Bake Recipe Evolution

My family first tasted the corn bake dish while celebrating Thanksgiving with our family friends, the Polskys. The dish is simple to make, and the result is similar to super moist corn bread.

The Original Corn Bake Recipe
1 egg
½ cup (1 stick) butter
1 cup of sour cream
1 can of cream style corn
1 can of kernel corn drained
1 package of Jiffy corn muffin mix

Mix all the ingredients together (I find it easier to mix in the cans of corn and the muffin mix last). Pour into a greased 9 x 9 inch square dish, cover with foil, bake for about an hour at 325F. Then remove the foil, and bake for another 15-30 minutes till doneness at 375F.


The corn bake dish has been a part of every Thanksgiving dinner for almost two decades. However, this year I decided that it was time for a change--I no longer wanted to stock up on Jiffy muffin mix, and I was disappointed to learn that the corn is not vegetarian because Jiffy muffin mix contains lard.

I used this corn bread recipe—the quickest fastest simplest recipe ever for a decent corn bread—as a point of reference. I also studied the ingredients of the Jiff corn muffin mix, which essentially boiled down to flour, corn meal, baking soda, salt and sugar.

After the first attempt, I decreased the amount of corn meal, and switched to using maple syrup instead of sugar or honey. The second attempt was a success, and that is exactly what mom baked for our Thanksgiving dinner.

The New Corn Bake Recipe
1 cup wheat flour
¾ cups corn meal
1 ½ tsp baking powder
½ tsp baking soda
½ tsp salt
1 egg beaten
¼ cup (½ stick) of butter, melted
1 cup plain yogurt (we used low-fat)
3 Tbsp maple syrup (honey can be substituted)
1 can of cream style corn
¼ cup corn (from a can or frozen and thawed; more can be added to taste)

Mix the wet ingredients. Then mix in the dry ingredients. Pour into a greased 9 x 9 inch square dish, cover with foil, bake for about an hour at 325F. Then remove the foil, and bake for another 15-30 minutes till doneness at 375F.

Monday, October 13, 2008

Successful But Less Than Classic Tarte Tatin

The Chocolate & Zucchini recipe for Tarte Tatin was indeed simpler. I followed every step in the recipe precisely—a rare occasion, and the result was tart and sweet but not too pretty. A fine combination. Of course I am no expert, but my tart seemed far from what I think a "classic" Tarte Tatin ought to be. No serious caramel formed around the apples, and the crust was very sweet. I may try to merge the best of these two recipes, if I don't lose interest in this dessert first.

Interestingly enough, I am not the only one with Tarte Tatin on my mind and in my kitchen.
molly's apple tarte tatinClearly the above photo is not of one of my creations, butI have been completely seduced by Smitten Kitchen's recipes and photos. Notice how one of the photos in the linked recipe shows using a mellon baller to core the apples--I must try that as soon as possible!

Saturday, October 11, 2008

My "Classic Tarte Tatin" Adventure

Bags of apples in the grocery store have been speaking to me. “Bake me, bake me!” they say. So last Sunday I embarked on another cooking adventure—baking the Classic Tarte Tatin.

After skinning and coring apples for over an hour I no longer wondered who ever buys those special tools to core apples. I watched the butter and sugar melt together in a frying mesmerized by the deep mahogany of the caramel seeping through the buttery paste. The whiff of burnt sugar brought me out of my happy stupor. I laid out the apple halves and admired the perfect pattern they formed in the pan as they cooked. My rolled out pastry did not look as pretty, but it did not have to be. The tart would be flipped when done, and the pastry would remain at the bottom to be eaten but not be seen.

With everything ready for baking I pushed the frying pan into the oven, but… the oven door would not shut. Prior to cooking I spent a long time making sure that my frying pan could withstand the heat of the oven, but it never occurred to me to check if it will fit. The pan with its nice long handle was too big for my smaller-then-standard-size oven.

Panic! I could see the pastry slowly melting on top of the warm caramelized apples. I could see the apples starting to spread apart destroying the pattern. I called Nick, because in a crisis I always call my husband. Nick did not help with his “move the tart into a smaller baking dish” solution. “That would destroy the amazing apple pattern,” I protested. Nick was not too sympathetic.

I hung up and tried to think of any neighbors I knew on whom I could impose with my tart. I called a friend who lives across the street in hopes that he was home, had a regular sized oven and was willing to let me use it. Luckily for him, he did not pick up. Since I clearly had no other choice, I followed Nick’s advice after all. I scooped the tart into a normal baking dish, and off it went into the oven to bake.

Half an hour later I had my “classic tarte tatin”—a shapeless mass with blotches of torn pastry on top. Caramelized apple puree betrayed the taste of burned sugar. For me a large scoop of vanilla ice cream obscured the bitterness quite well. Nick, on the other hand, was not convinced that apple mush mixed in with the soft pie crust constituted a worthy dessert. So he went back to his beloved sherbet instead.

Since the failure, I have found a simpler tarte tatin recipe, where the frying pan does not need to go into the oven. Perhaps it is not "Classic", but I think I will try this one next time, hopefully with a little more luck.
Sunday, March 2, 2008

Still Baking

By the end of the day today I have baked 49 Devil's Food cupcakes and managed to keep myself from eating any of them. That was before I baked countless Gingerbread Cookies (see my previous post on the subject), and after putting together 12 cups of fresh fruit in jellied white grape juice.

Oh, and because this amount of baking is definitely not enough, I baked pumpkin muffins first thing in the morning--not for the bake sale, but for my breakfast of course.

Saturday, March 1, 2008

Stand Mixer's Bowl's Abyss

Besides running over 8 miles today, I have done nothing but work on preparing for the bake sale on Tuesday. What do you do on Saturday to prepare for a bake sale on Tuesday? You make a lot of cookie dough. My refrigerator already is chilling a double batch of peanut butter and a batch of chocolate chip cookie dough.

To help me along, I have this wonderful KitchenAid stand mixer. We are truely a team. It mixes while I measure out the next ingredient. It is a true friend. It never fails. We go back years; coming up on 4 years to be exact. But alas, it has limits. It turns out that the mixing bowl capacity is not infinite. It just happens that the Betty Crocker's Gingerbread Cookie recipe, when doubled, is a bit too much for the mixer's bowl.

Now that you know this valuable fact, please do not try the doubling fit at home. Otherwise, you'll first find a butter/water/molasses mixture splattered all over your kitchen counter and walls. Later you will discover that counting 14 cups of flour, using a half a cup while watching West Wing is pretty much impossible. No, wait. You can count them, but the final count might not be 14. Finally, you will discover, while adding your 14th (maybe) cup of flour, that the mixer speed is terribly slow, and it is emitting an extraordinary amount of heat. It also takes an enormous effort of strength on your part to lift the head of the mixer out of the dough.

As you might guess, I will not be attempting to make a double batch of this recipe again for awhile. In the meantime, I am taking bets on how much of this dough will actually get baked before the bake sale.

Tuesday, February 12, 2008

Another Brioche Attempt--Without Water

After Shaping I was watching Diary of a Foodie on PBS, and the brioche recipe they used intrigued me. The recipe does not use any water or milk. So the liquid in the dough comes entirely from eggs! Yes, that is a lot of eggs.

I used the ingredients exactly as listed in the recipe. Mixing the dough was fun, though I think I smacked it against the mixing bowl a bit too hard, because I am now sporting a few bruises on my wrists.

After the 2nd risingBeyond mixing, the directions lacked a few details. I refrigerated the dough before trying to shape it--otherwise it was too sticky. I believe this is normal for any dough significantly enriched with butter (half a pound in this case!) . Can anyone find oven temperature in this recipe? I used 375F, but it probably should have been 350F.

Waterless BriocheI had a little bit of trouble rolling out pieces of the braid—I have been trying to use the counter to avoid having to clean my enormous wooden board. Laziness prevails of course. While the counter is great for working the dough, it is too slippery for rolling—cannot beat wet wood. I also wonder if I did not let the dough rise enough.

My brioche came out a bit on the stiff side and definitely eggy in taste. I might have to go back to water after all. But this was fun.

Sunday, December 2, 2007

Brioche

It seemed too cold to run when I got up this morning, so I decided to first deal with the brioche dough I had rising in the fridge since yesterday.

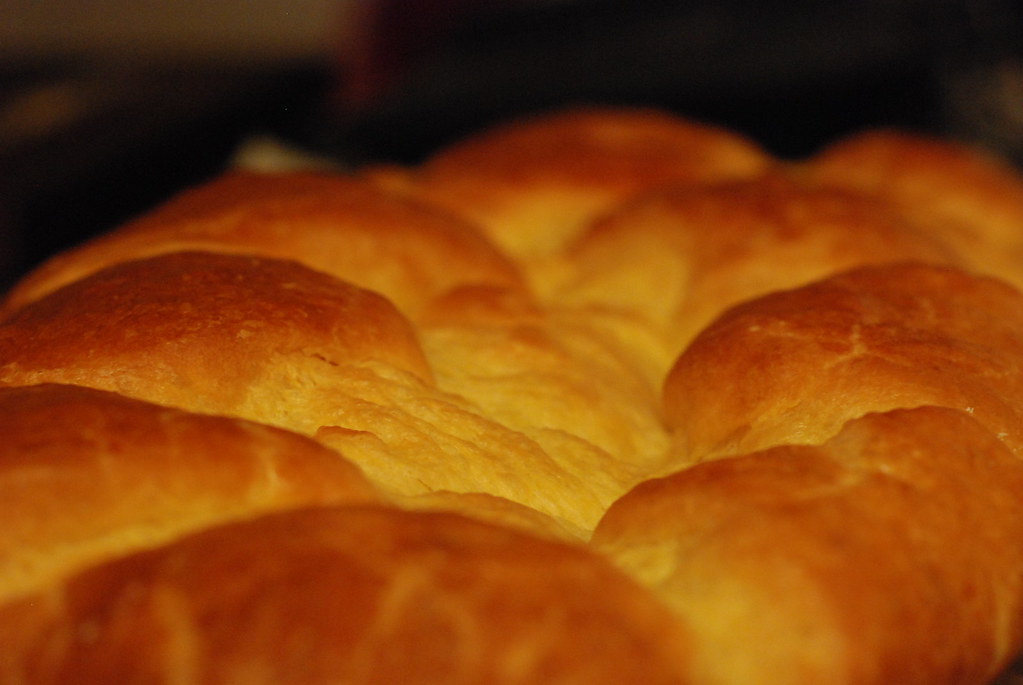
I baked half of the dough last night into rolls. They came out ok, but not too great. The remaining dough has doubled in size, since I last looked at it last night--an excellent sign. I split the dough into 3 parts, and rolled out each one as if I were making baguettes. I then braided the dough, and left it to proof while I went out for a run.


After the run, and a nice shower, I egg-washed the shaped dough and sat by my oven that cannot maintain constant temperature, for over 30 minutes while the bread baked. The result is yet to be checked for taste, but looks like I proofed the bread a bit too long after shaping it. Will have to work on that next time.